0951
Open-Source Console Software for the MRI4ALL Hackathon Scanner1Bernard and Irene Schwartz Center for Biomedical Imaging, Department of Radiology, New York University Grossman School of Medicine, New York University, New York, NY, United States, New York City, NY, United States, 2Accessible Magnetic Resonance Laboratory, Biomedical Imaging and Engineering Institute, Department of Diagnostic, Molecular and Interventional Radiology, Icahn School of Medicine at Mt. Sinai, New York, NY, United States, New York City, NY, United States
Synopsis
Keywords: Software Tools, New Devices, Open-Source
Motivation: Commercial MRI scanners have limited accessibility due to high costs and the proprietary nature of the hardware and software platforms.
Goal(s): To develop a comprehensive console software for community-built low-field MRI systems that is solely based on open-source components and provides a user interface similar to commercial systems.
Approach: The console software was programmed in the Python programming language. The platform is divided into three decoupled services that 1) provide the interface for scan planning and visualization, 2) run the scanner control, and 3) perform the image reconstruction.
Results: The architecture is described, providing a starting point for utilizing it in other projects.
Impact: The development of open-source MRI software and hardware will help to disseminate fundamental knowledge about the construction of MRI scanners. The software platform described in this work may serve as foundation for future community initiatives on building open-source scanners.
Introduction
Goal of the MRI4ALL Hackathon 2023 was to build a complete low-field MRI system and to release all developments as open-source packages. Because it is planned to use the scanner for educational purposes and as reference design for future initiatives, the activities included development of a comprehensive software platform that provides an interface comparable to commercial MRI systems. While primarily created for the MRI4ALL scanner, care was taken to ensure that the software can be used beyond the hackathon, such as for scanners developed by other groups.Here, we describe the software stack and architecture of the console software. Additional information and the source code can be found in the project’s GitHub workspace1.
Methods
Development EnvironmentA unified development environment was created using the Ubuntu 22.04 operating system2. Provisioning scripts have been created to enable automated installation of the environment on Intel-based computers using VirtualBox3 and Vagrant4, which clone the code repository and install required dependencies. Visual Studio Code5 was selected as IDE, which is installed on the host computer and connects to the environment over SSH while the authentication for code submissions is managed on the host. Therefore, the environment can be installed or recreated in minutes without requiring user interaction. Instructions were shared with participants prior to the hackathon, so that all members of the software team were ready to work right away.
Software Stack
Only open-source packages were utilized as software components. Python was selected as programming language, as it is widely accepted and offers numerous libraries for scientific computing. The graphical user interface was realized with PyQt56, which provides numerous interface controls and seemed best suited for rapid prototyping. Qt Creator7 was used for interface design, and the matplotlib8 and PyQtGraph9 libraries were integrated for visualization of results.
The scanner hardware is driven by a Red Pitaya 122-16 FPGA board10, which is controlled from Python through the MaRCoS framework11. The PyPulseq12 library was utilized to calculate sequence descriptions, which are translated into a MaRCoS-readable format using the FLOCRA interpreter13.
Architecture
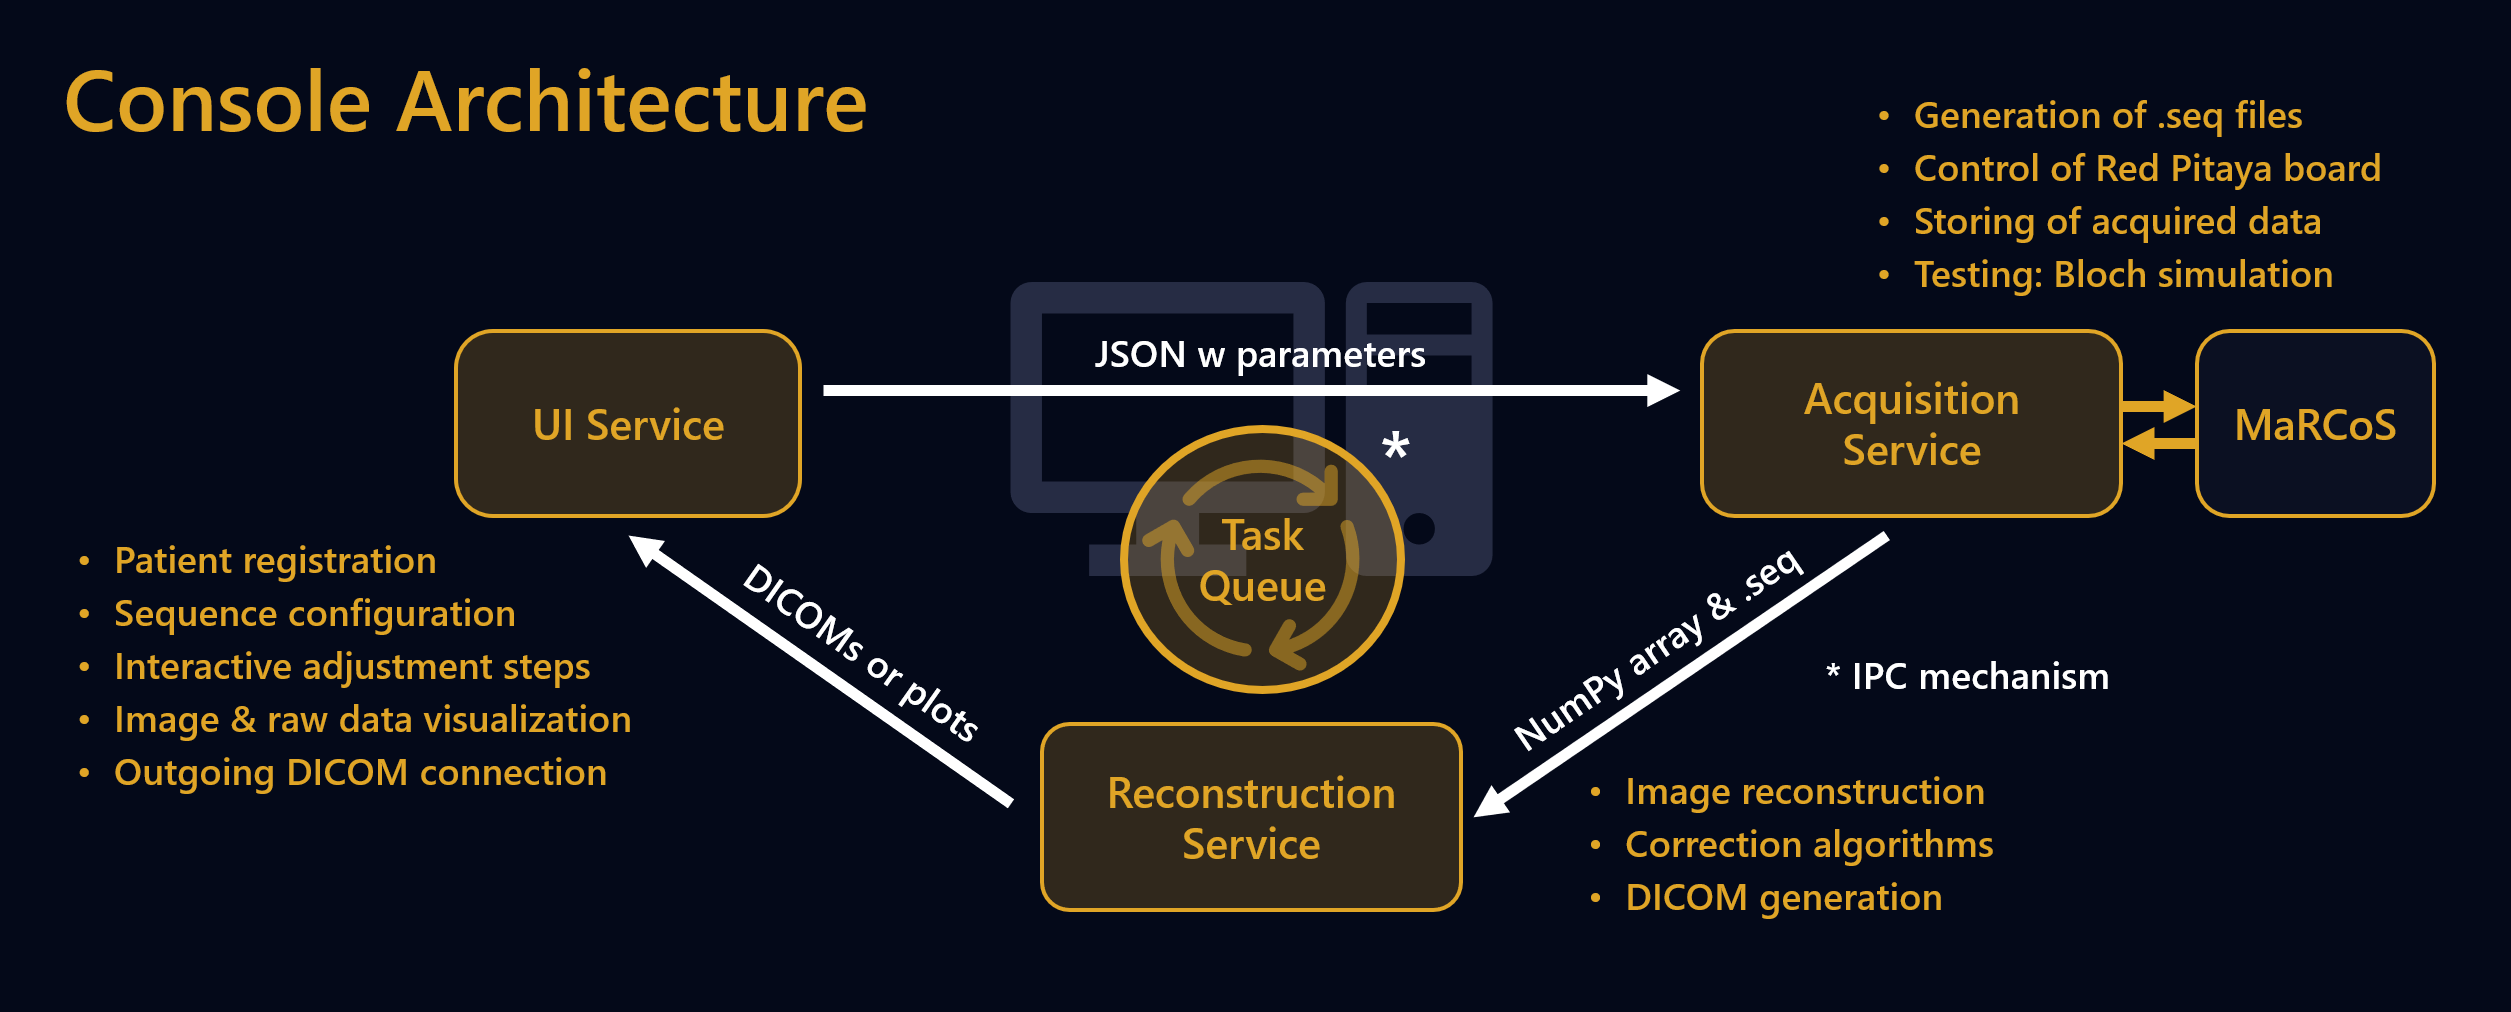
To provide a responsive user experience, the software has been divided into three decoupled service processes (Figure 1): UI, acquisition, and reconstruction. This architecture allows configuring protocols or reviewing results while the scanner is running another sequence. The services interact through a folder-based task queuing system and can additionally communicate over a FIFO-based IPC mechanism to display interactive adjustment dialogs or status updates.
Folder-based queuing has the advantage that each service can be developed and tested independently by injecting test tasks into the queuing path. This enabled the development teams to work independently during the hackathon. Tasks are stored in separate subfolders and contain a JSON file that describes the requested sequence type, scan parameters, adjustment and reconstruction settings, scanner information, and a list of results, which is populated during the scan. Moreover, scan tasks contain defined subfolders into which the services are expected to place created files, such as acquired raw data or reconstructed images. The acquisition and reconstruction services have separate input queues and process one task at a time. Failed and completed tasks are archived with intermediate files and can be easily inspected for debugging.
Sequence Integration
Custom sequences can be integrated by deriving a Python class that the platform defines, which acts as application interface and allows enumerating installed sequences. The interface includes entry-functions for loading and saving parameters, showing controls in the UI, preparing calculations, and executing the sequence. Therefore, low effort is needed for adding new sequences, as most work, such as state or protocol management, is covered by the platform. However, high flexibility remains, allowing sequences to show arbitrary UI controls or to utilize alternative libraries for the sequence generation.
Results
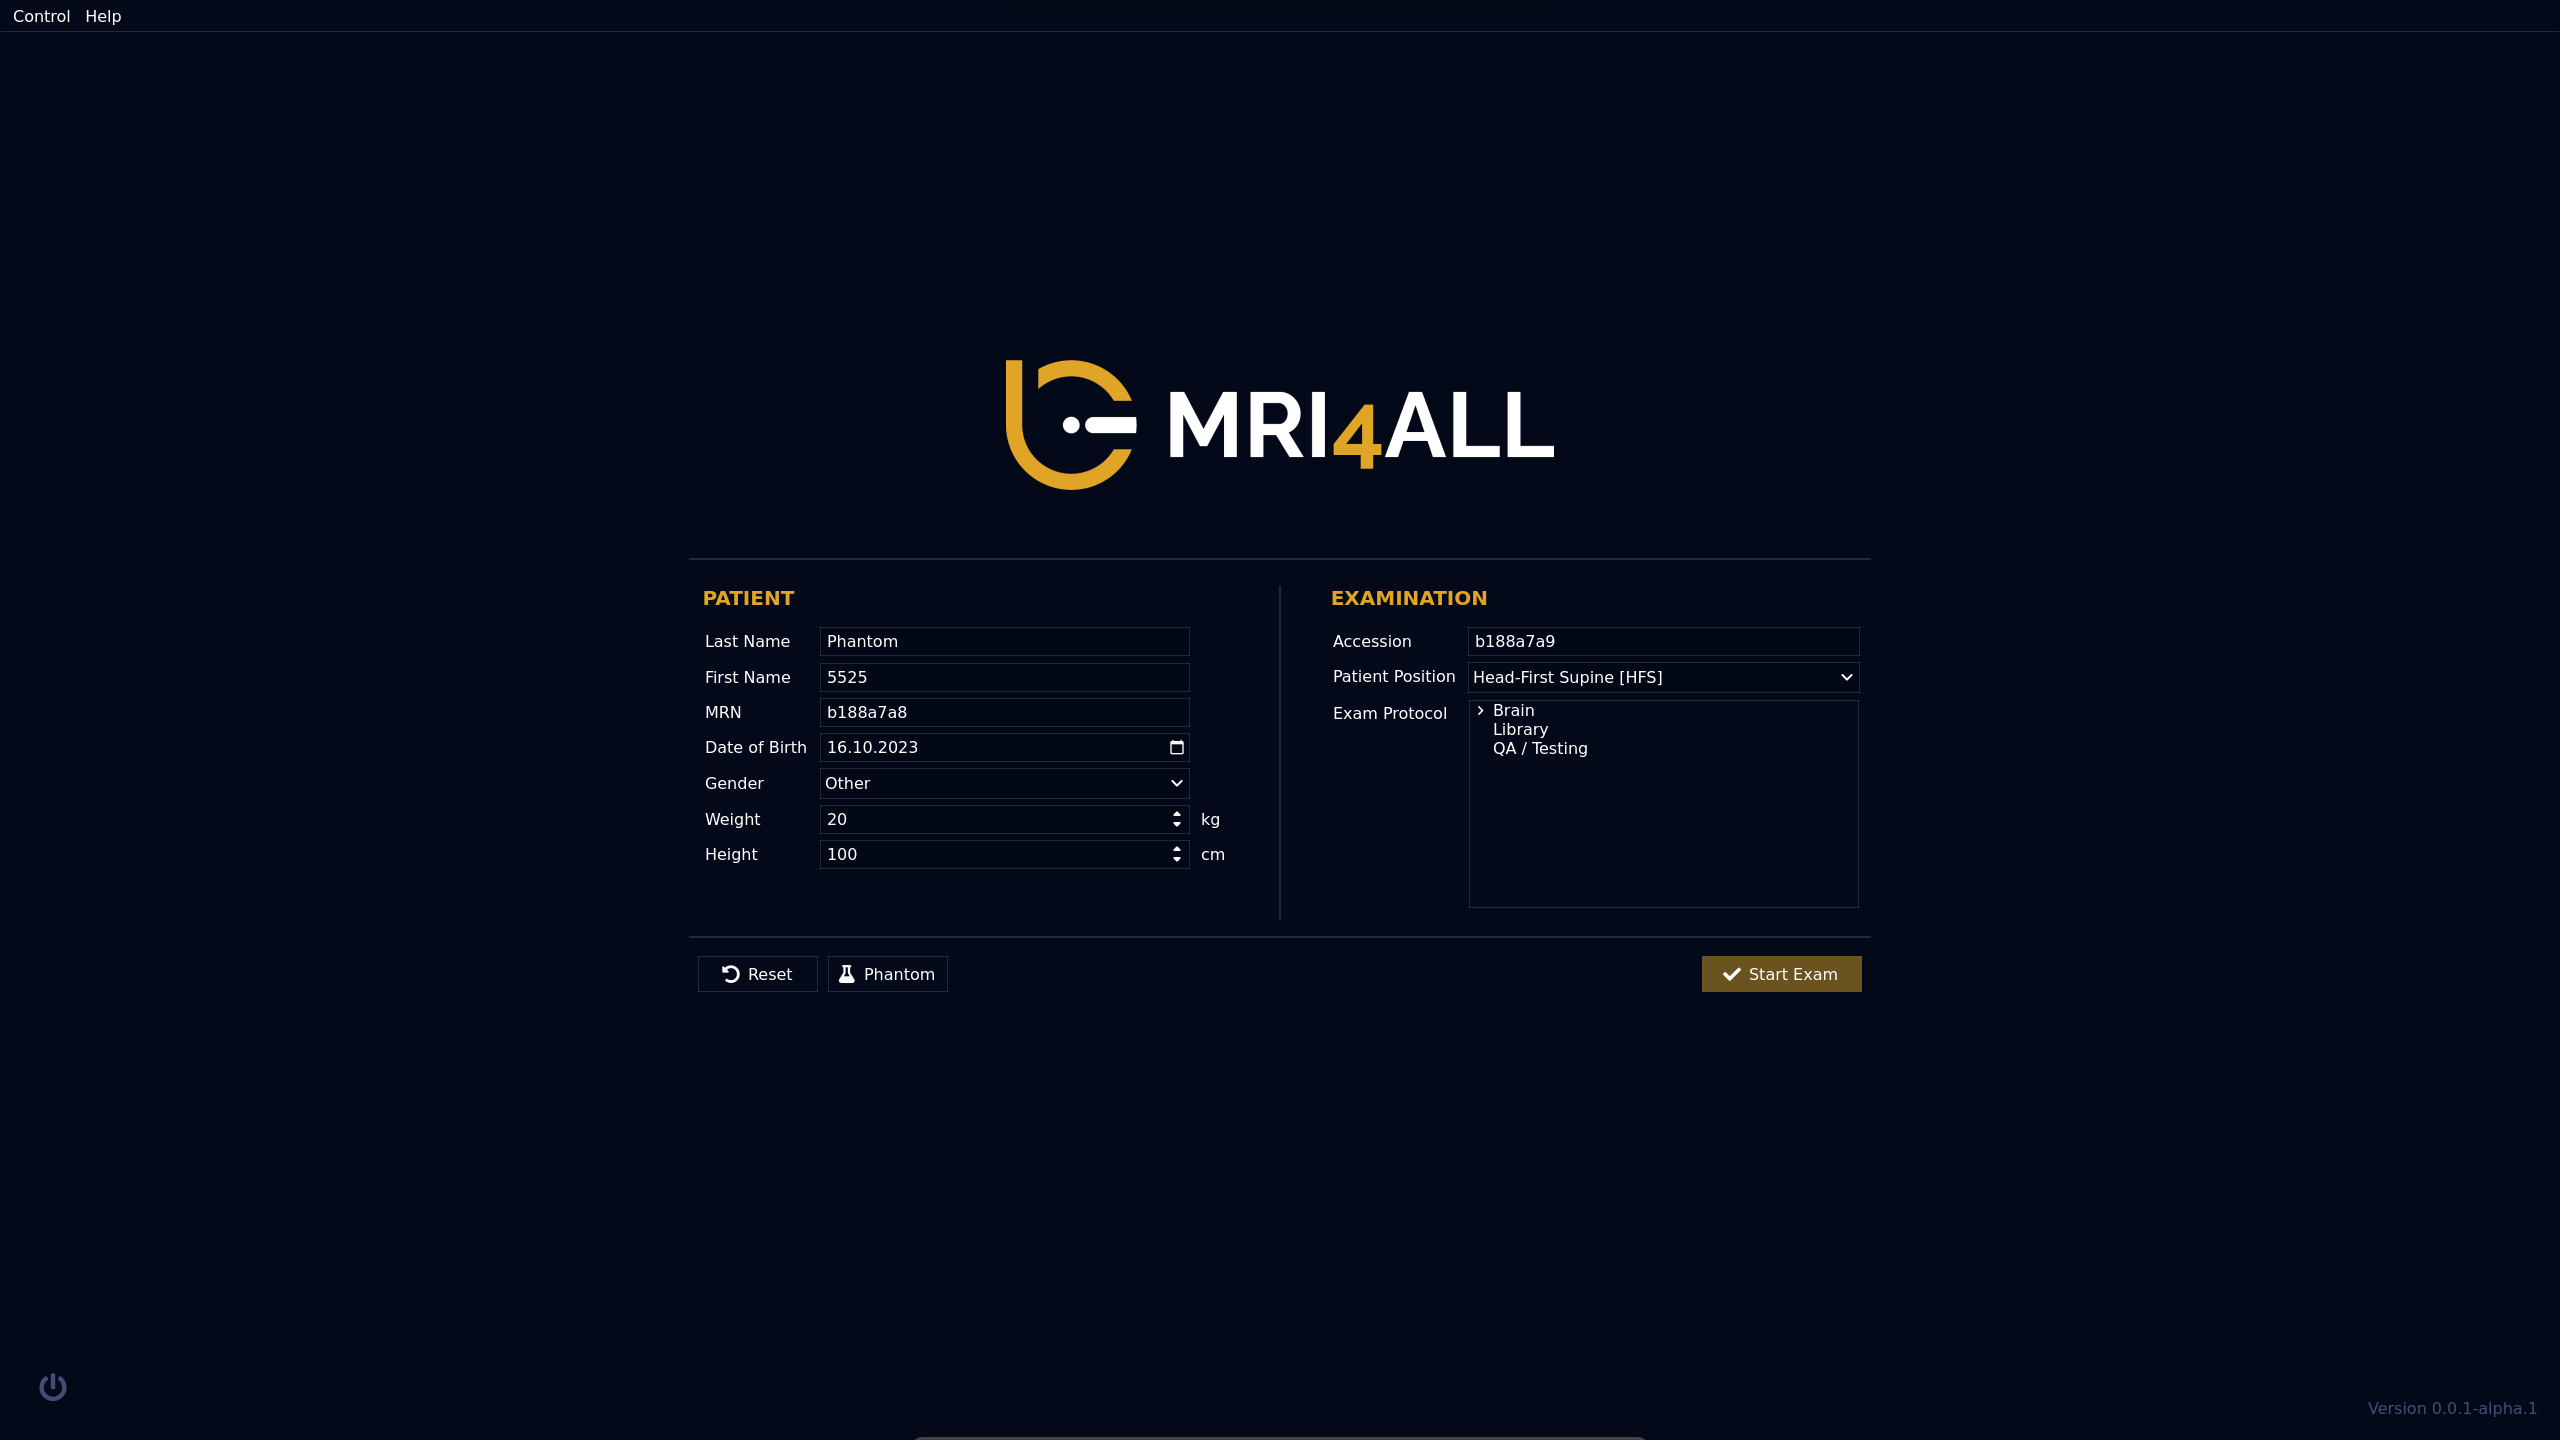
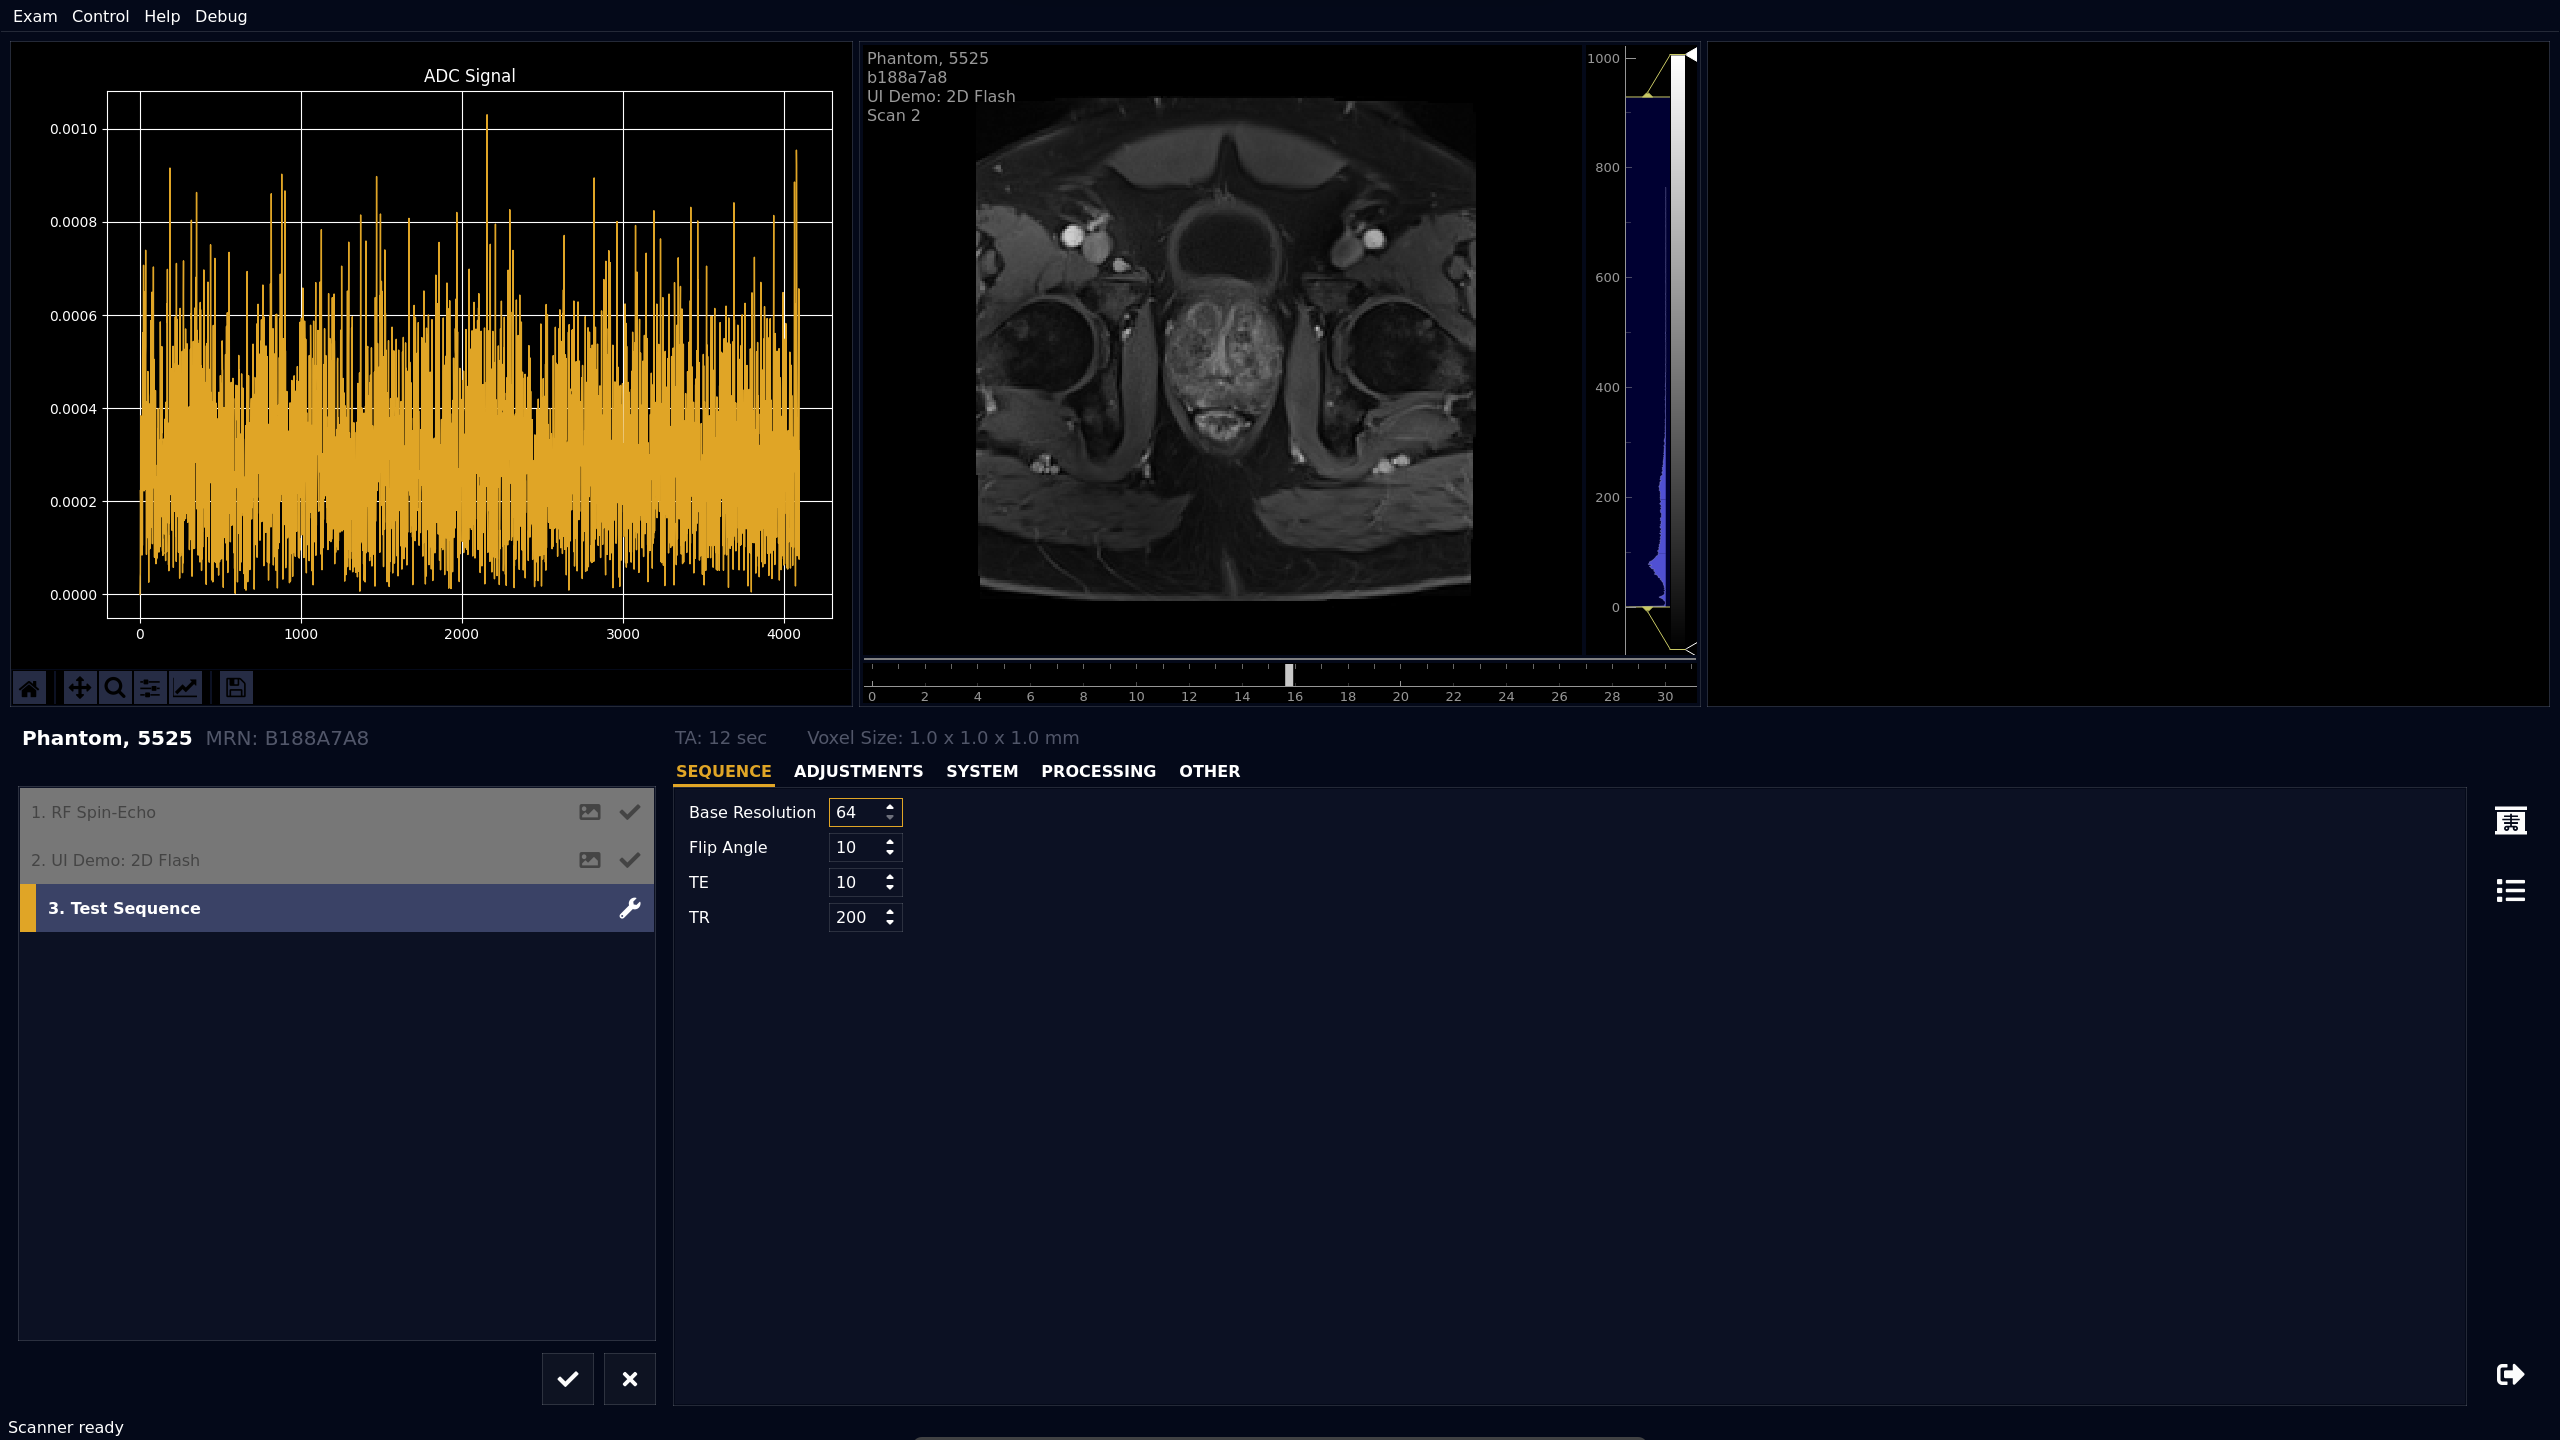
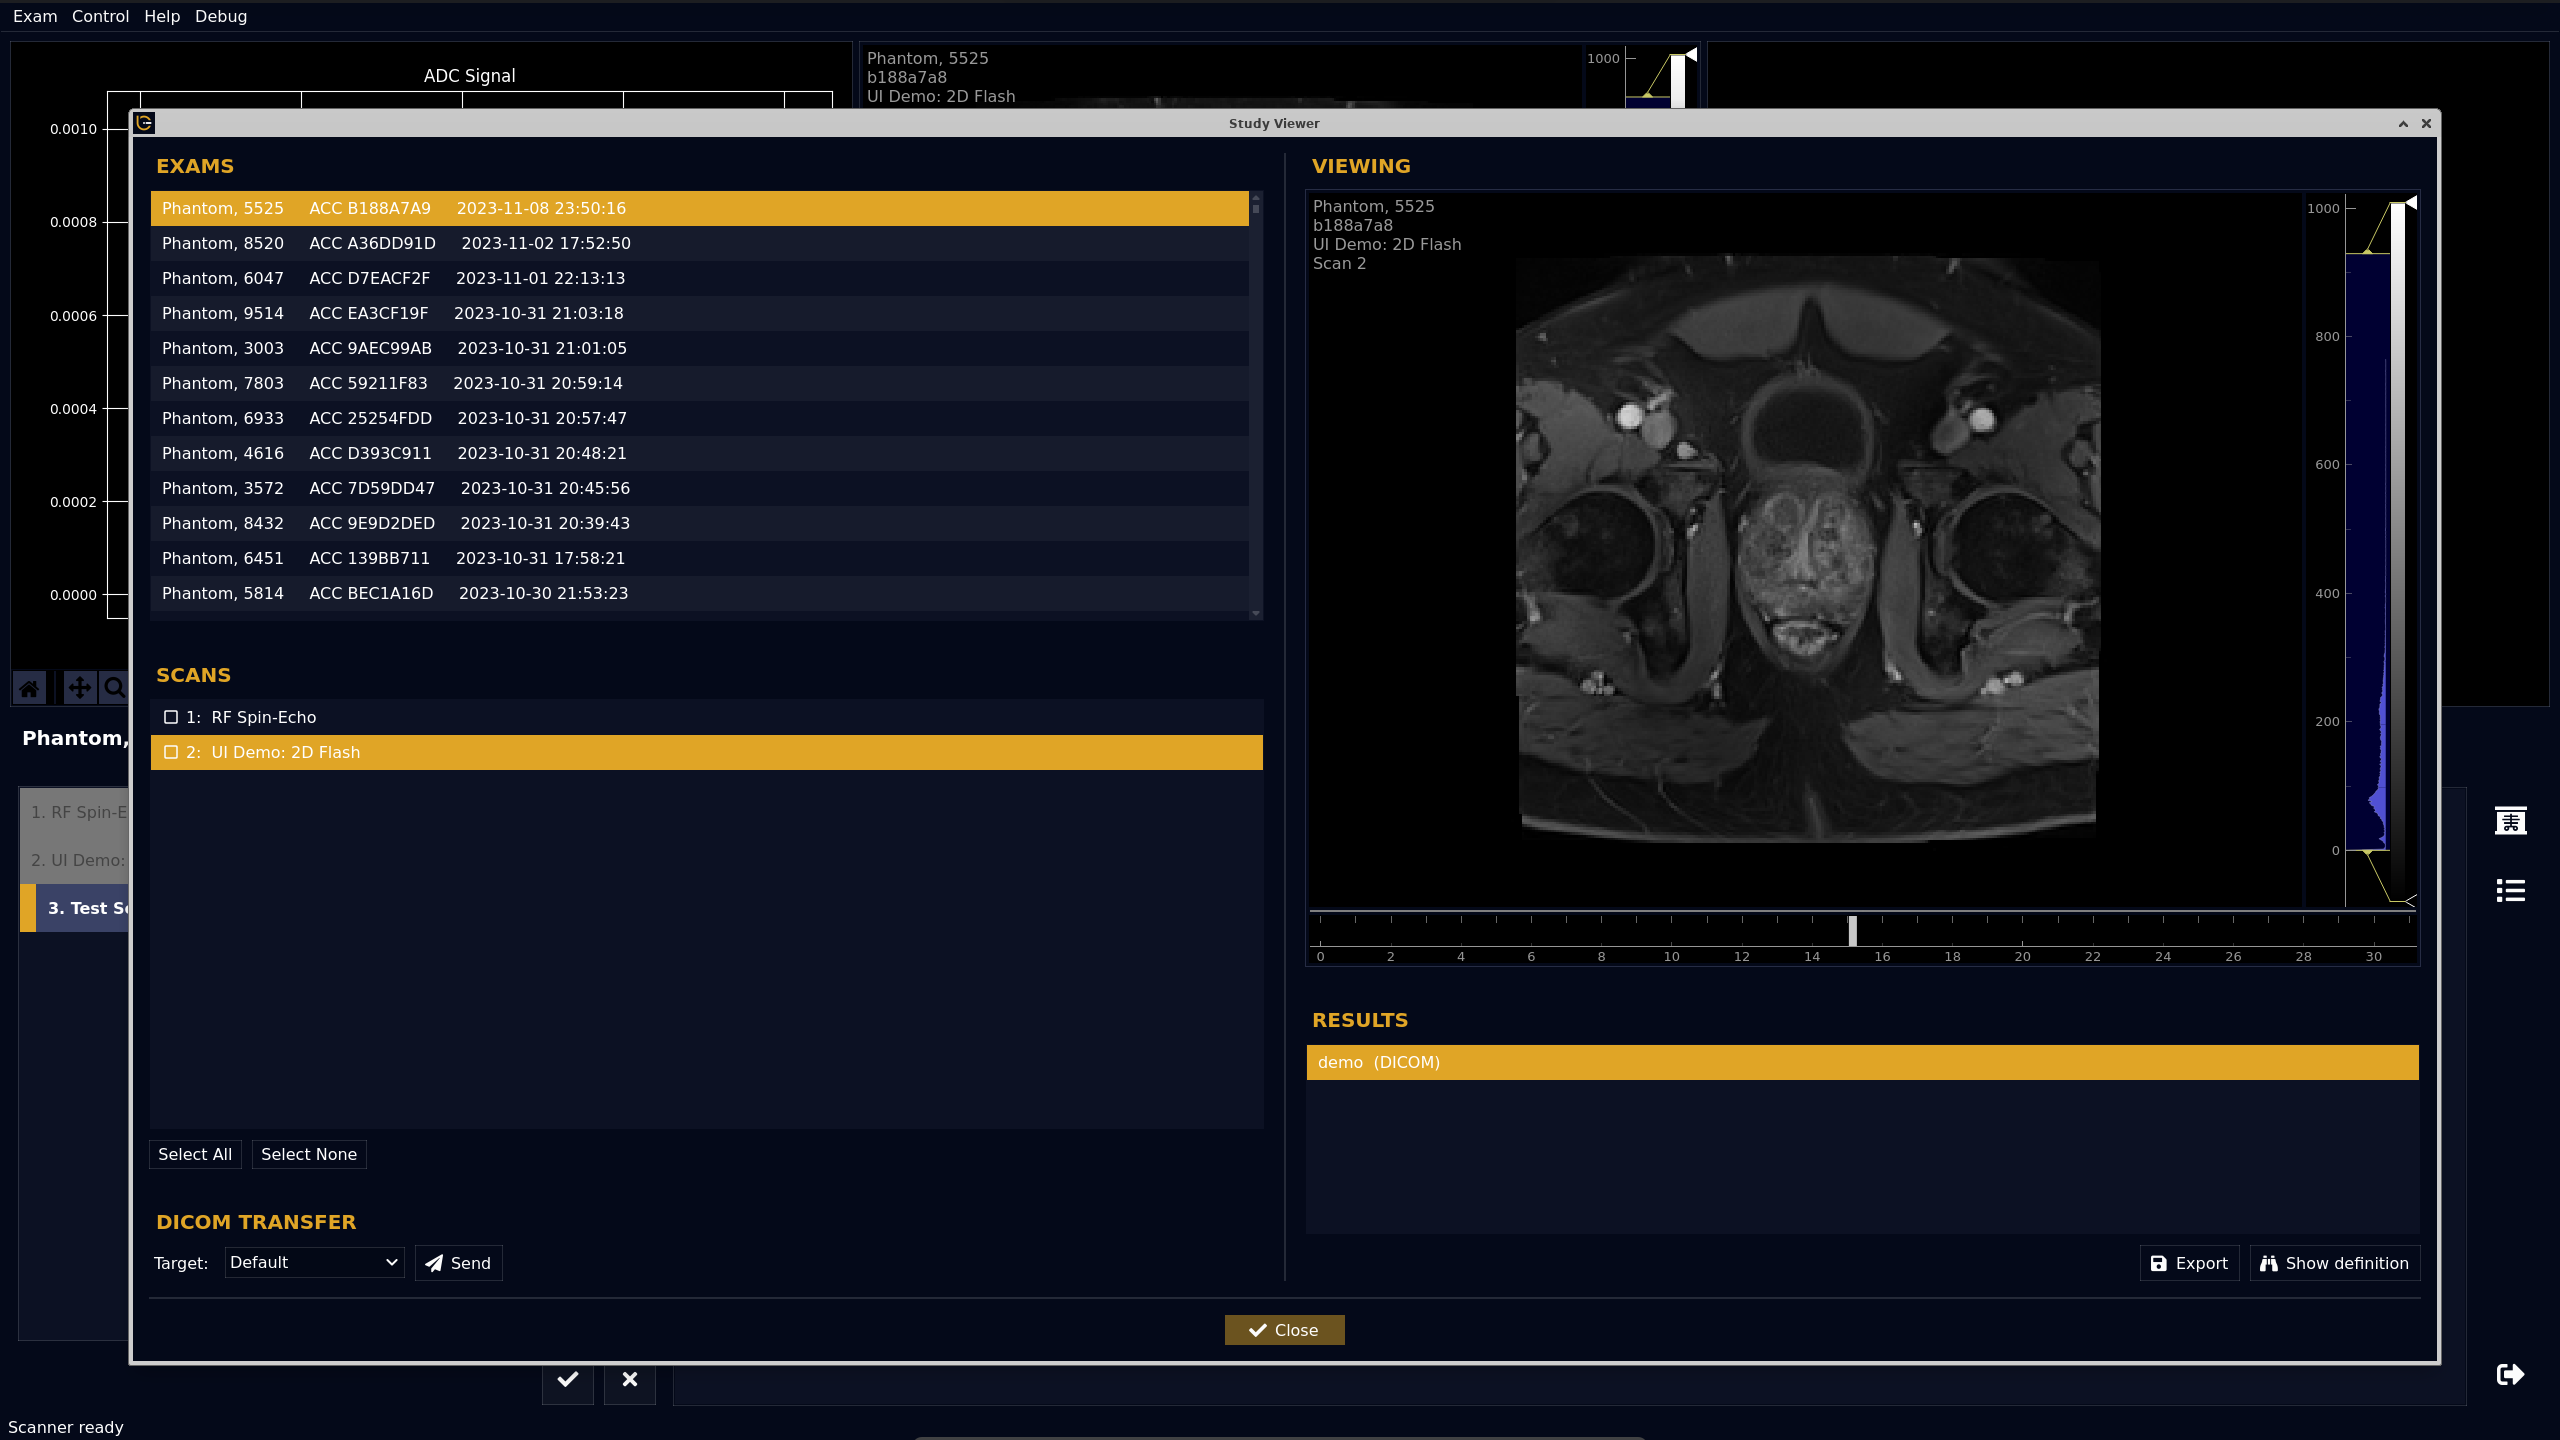
Figure 2 shows the registration dialog that appears when starting the scanner. The scan interface shown in Figure 3 can be used to plan and start scans. Sequences can be inserted into the scan queue on the left side and configured using the parameter tabs on the right side. Once configured, sequences are added to the acquisition queue and executed by the scanner. Results are shown automatically in the inline viewers. Previous scans can be reviewed in the Study Viewer (Figure 4).Discussion
To our knowledge, MRI4ALL was the first community effort to create a complete open-source scanner with functionality similar to commercial systems. While much work is needed to achieve comparable image quality and reliability, our hope is that the software platform described here will serve as foundation for future initiatives and help to consolidate development activities in the community.Acknowledgements
This work has been done as part of the MRI4ALL Hackathon hosted at New York University in October 2023. It was supported by all the organizers of the event, as well as by NYU Langone Health.References
- https://github.com/mri4all
- https://ubuntu.com
- https://www.virtualbox.org
- https://www.vagrantup.com
- https://code.visualstudio.com
- https://riverbankcomputing.com/software/pyqt
- https://www.qt.io/product/development-tools?utm_term=qtcreator
- https://matplotlib.org
- https://pyqtgraph.readthedocs.io
- https://redpitaya.com/sdrlab-122-16
- https://github.com/vnegnev/marcos_extras/wiki
- https://github.com/imr-framework/pypulseq
- https://github.com/LincolnCB/flocra-pulseq
Figures